MX Linux is one of the most popular Linux distributions (according to Distrowatch), but until recently, it wasn’t possible to install it on a Raspberry Pi. They now have an image for it and in this guide, I’ll show you how to install it on your Pi.
MX Linux for Raspberry Pi is now available on the official website. It’s based on Raspberry Pi OS, using XFCE for the desktop environment, and it’s supported for Raspberry Pi 3, 4/400 and 5.
In this tutorial, I will walk you through installing and flashing MX Linux onto your Raspberry Pi. I will then walk you through the first setup steps and look at some interactive Desktop interface tools that make this unique.
If you’re looking to quickly progress on Raspberry Pi, you can check out my e-book here. It’s a 30-day challenge where you learn one new thing every day until you become a Raspberry Pi expert. The first third of the book teaches you the basics, but the following chapters include projects you can try on your own.
Getting Ready to Install MX Linux
Before starting, I will list the requirements (both hardware and software) for following this tutorial. This is a Linux distribution, so the process is similar to any other Linux distro installation.
- A Raspberry Pi 4, 5 or 400: Being a spin-off of the original Raspberry Pi OS image with key additions, the official website says it’s been tested on Raspberry Pi 4, 5 and 400 and does not work on older Pi models. For context, I’m testing onmy Raspberry Pi 4 (2GB).
Note: As of April 2024, MX Linux does not work for any Raspberry Pi models older than Raspberry Pi 4.
- A micro-SD card or USB stick: You can pick whichever you have. You will need a storage option with at least 16 GB as the OS image is over 7 Gigs. If you don’t have one handy and need a new SD card for this tutorial,find our current recommendations here.
- Raspberry Pi Imager or Balena Etcher:MX Linux is not available in Raspberry Pi Imager for now, but you can flash a custom image with those tools, so pick the one you prefer.
I have a complete guide for Raspberry Pi Imager here if you need it.
That is all for the requirements. Of course, you will need a power source for your Raspberry Pi and a monitor and keyboard to complete the first setup, as SSH is disabled by default.
Installing MX Linux on Raspberry Pi
I will take you through the process of installing the MX Linux in three easy steps:
- Getting the Latest MX Linux Image for your Raspberry Pi.
- Flashing this Image onto an SD Card.
- Raspberry Pi First Boot.
Let’s dive deep into each step now.
Step 1: Getting the Latest OS Image
It is easy to obtain the latest image of MX Linux from its website. Remember that we want the image for our Raspberry Pi. First, go to the official downloads page for MX Linux by going to this page.
You will see the different desktop options available for the latest version of MX Linux (23.2 at the time of writing this article). The Raspberry Pi-supported version is only available for Xfce so we will find the download link for the Raspberry P image under that section.
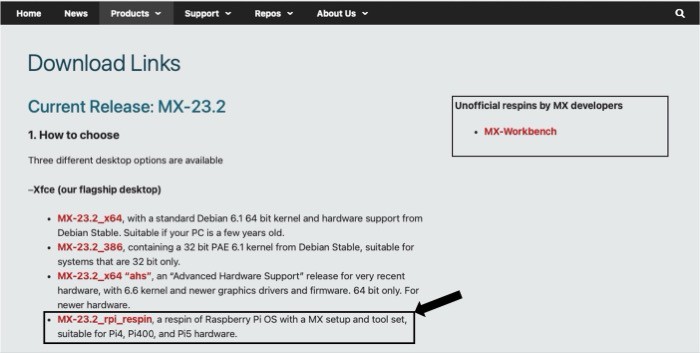
Clicking on that link will redirect you to sourceforge, where the image is available. The download will automatically start in 5 seconds and should take a few minutes to complete depending on your Internet speed as the overall size of the image is quite large (2.21 GB, to be exact).
Step 2: Flashing the Downloaded Image
Great! You now have the latest MX Linux image on your system. Let’s flash this image onto an SD Card or USB Drive. You can use any flashing software you like (Raspberry Pi Imager, Balena Etcher, etc).
Download Your Essential Linux Commands Guide!
It's a free PDF guide containing every Raspberry Pi Linux command you should know!
Download now
I will be using the Raspberry Pi Imager, so for that follow the steps given below:
- Start Raspberry Pi Imager.
- Click on the “Choose Device” button and select the Raspberry Pi device you own.
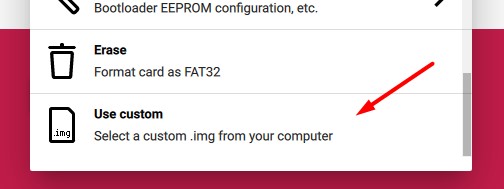
- Click on “Choose OS”, scroll down to the bottom of the list, and click on“Use custom”:

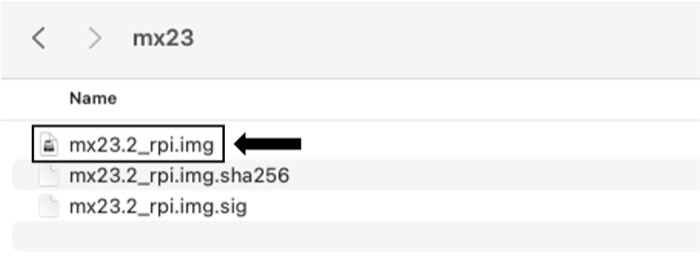
- Pick the image file you downloadedfrom the official website.It will download as a zip file that you need to extract as it contains multiple files. The extracted content will have an .img file, which we will use.

- Click “Choose Storage”and pick your SD card or USB drive. Ensure they are plugged in correctly, and you don’t choose the wrong device as Imager will format the selected drive.
- Thenclick on “Write”to start the installation. Note: setting the Advanced Options for this OS often leads to boot issues, so keep in mind NOT to apply any of itsOS Customization options.

Once you press the button, the write process will start. The system may ask for your password to start the installation so don’t panic if it does that. Now wait for a few minutes for the process to complete.

Once the writing process is completed, you can remove the SD card (or USB drive) from your computer and plug it into your Raspberry Pi.
Step 3: First Boot Instructions
Once you turn on the Raspberry Pi after inserting the SD card, we will boot into MX Linux for the first time. I recommend connecting your Pi to a monitor, keyboard and mouse, at least for the first boot (SSH is not enabled by default as there are no customization options).
It comes with a nice first-time setup wizard that allows the user to customize options and create a new default user. Let’s go through the default setup.
Join Our Community!
Connect, learn, and grow with other Raspberry Pi enthusiasts. Support RaspberryTips and enjoy an ad-free reading experience. Get exclusive monthly video tutorials and many other benefits.
Learn more
The setup will start with a welcome screen. It will give you some information about MX Linux and some general instructions. You can change the Keyboard settings from this screen as well. Just Press the next button to move to the next step.

The next window will allow you to configure your system’s hostname and domain name, and enable/disable the Samba server for MS networking (You Pi will show as a Network drive on Windows systems, enabling file sharing). After setting things up, press the next button.

The next window allows you to set up the locale and default timezone for your system. Note that if you are connected to the Internet, it will be able to select the appropriate time zone automatically. Make sure everything looks good and press the Next button.

In the final step, you can create a default user and optionally a root user for your system. Moreover, you can even enable auto login with your root user. For now, I will set up the default user credentials and then press the next button.
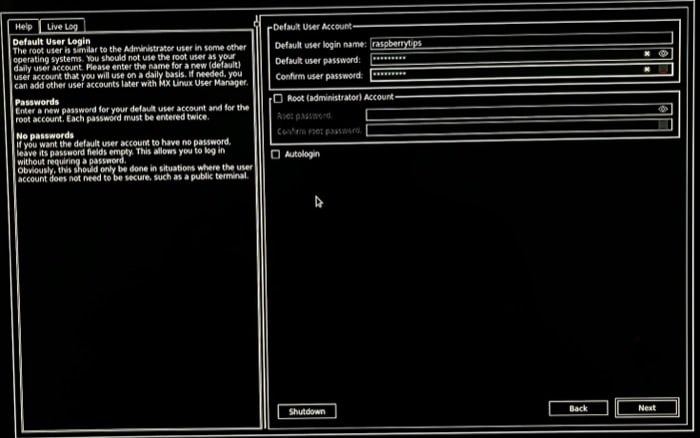
It will show a loading screen while the system configures all the settings we selected. It may take a few seconds so just be patient.

Once the setup wizard is complete, you will be taken to the login screen for your MX Linux system. You can login through the credentials you just set and start using MX Linux on your Pi!
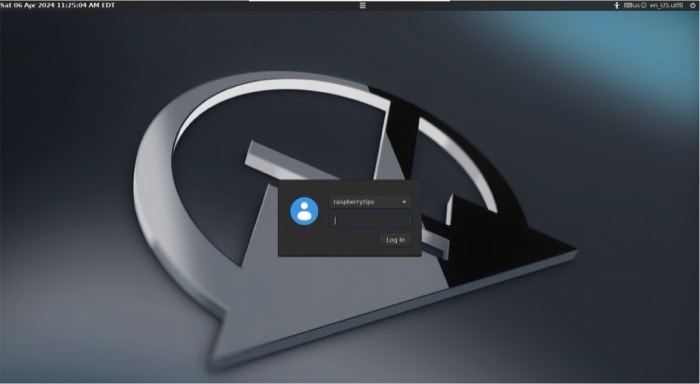
Congratulations, you have successfully installed and setup MX Linux on your Raspberry Pi!
Download Your Essential Linux Commands Guide!
It's a free PDF guide containing every Raspberry Pi Linux command you should know!
Download now
Getting Started with MX Linux
This section will cover the basics and first experience with this new operating system.
Post Installation Guide: First Steps
Connecting to Internet
- First, let’s connect our Pi to the Internet. For that, you can either establish a wired Ethernet connection or wirelessly to a WiFi network. Connecting to a WiFi network is very easy with MX Linux. They give a rich GUI for the Network Manager utility (which is used to connect to networks).
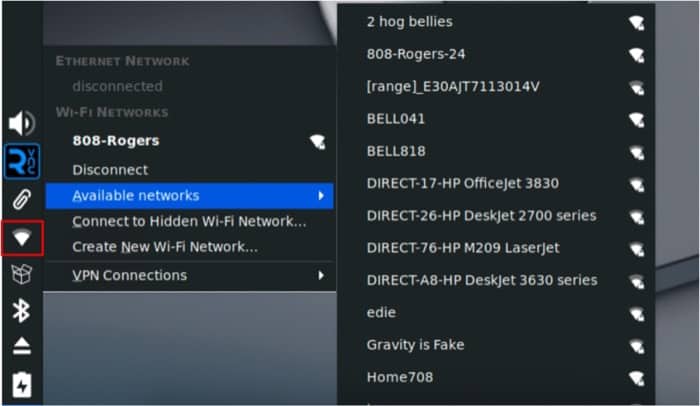
- From the desktop interface, press on the Network icon from the left side panel. Then, expand the Available networks option to see the available WiFi networks.

- This will open a list of available networks for you. Select the network you would like to connect to, enter the password for that network and then press Enter.

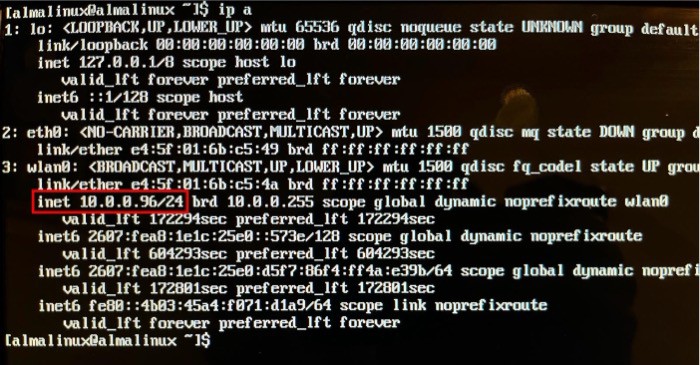
- If everything goes well, you should now be connected to your WiFi Network. To verify, just type in the following command:
ip aThis should show the wlan0 option listed with an inet option, which means that your Pi is now connected to the Internet.

Are you a bit lost in the Linux command line?Check this article first for the most important commands to remember and a free downloadable cheat sheet so you can have the commands at your fingertips.
Download Your Essential Linux Commands Guide!
It's a free PDF guide containing every Raspberry Pi Linux command you should know!
Download now
Checking for Updates
MX Linux uses the Synaptic Package Manager. It has a user interface for checking and performing updates on packages that is easy to use.
On the left side of the screen, there will be a box-shaped icon for the Synaptic Package Manager. Right-click on it and press the Check for Updates option.
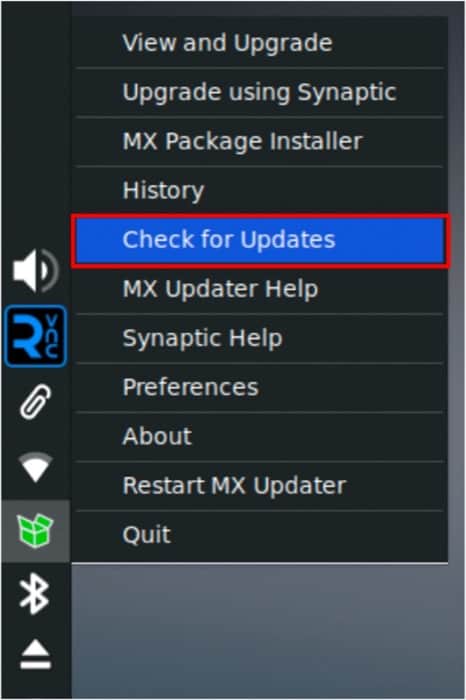
This will open a new window that will run the command to get the list of upgradable packages.
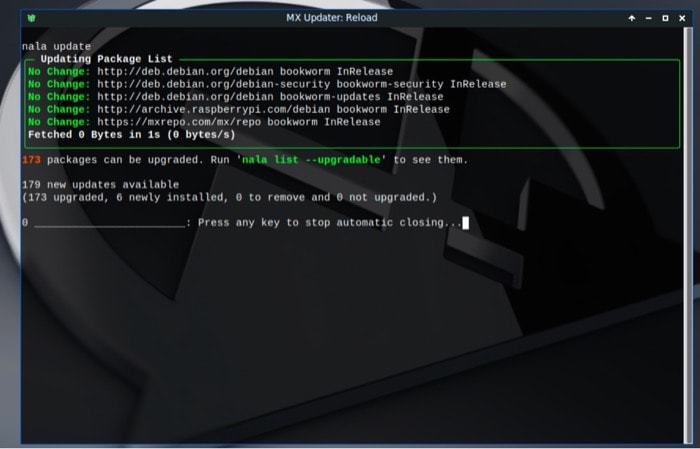
Once this process is complete, the box on the left should be green, indicating that new updates are available. Left-clicking it will open a window that shows the list of upgradable packages. Just check the boxes highlighted (so you don’t have to press Y every time) and press the Upgrade button.
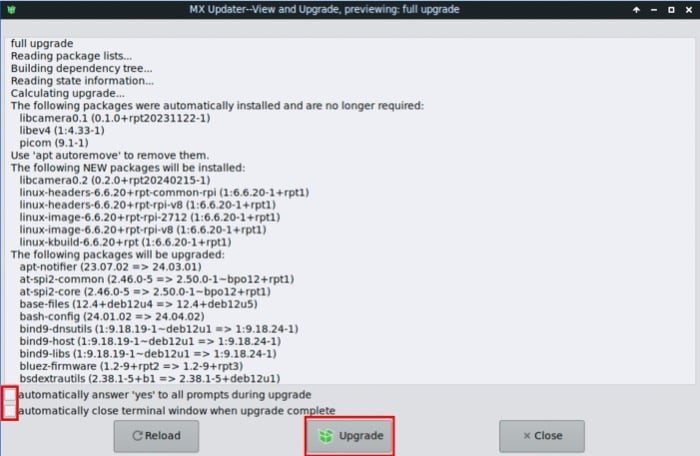
This will start the upgrade process. The initial update will take quite some time so be patient and brew a nice cup of coffee while you wait. The terminal will automatically close (as we ticked that option) once the updates are completed.
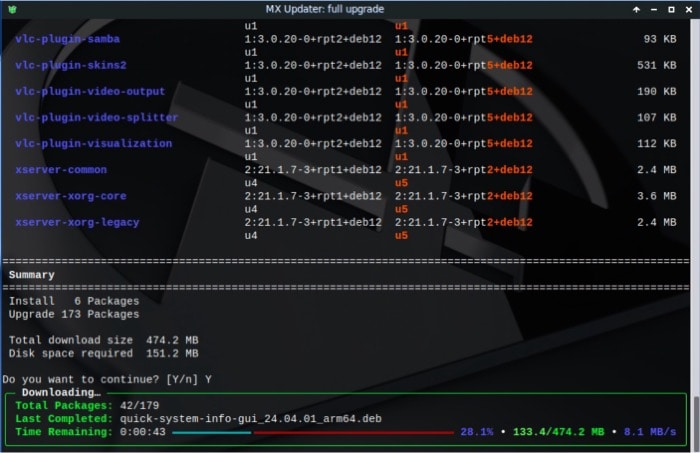
These are the first essential steps you should perform when you install any new operating system. In the next section, we will go through some key features of MX Linux, which makes it stand out in this crowd of Linux Distributions available for the Pi.
MX Linux Features
A Customizable Desktop Interface
MX Linux offers rich customization features for the User Interface and Experience. So, let’s explore some of the key distinguishing features it offers.
“Conkys!” The Conky Theme Manager
MX Linux offers various customization options to improve the overall user experience. For instance, one such unique feature is MX Conky Manager, which is a Widget manager for MX Linux. It allows you to choose from numerous styled widgets for your Desktop.
To open it, click the MX Linux icon on the bottom right of the screen and type “Conky” in the search bar. You should see the Conky Manager option, click on it to open the window.

The Conky Theme Manager window will show various widget options you can choose from. Each widget will be visible on the Desktop and display different amounts of information about the system like the temperature of the CPU (very useful for the Pi!).

I like this BBQ-Digital-colours widget as having used Linux for quite some time now, I know how useful the information shown in this widget is! In short, the possibilities are endless.
Custom Themes
In addition to Conky, you can customize and set various themes for your Desktop UI. To do this, go to the Whisker menu (like the Start menu for Linux) for MX Linux (again, by pressing the logo icon at the bottom) and search “Appearance”.

This will open a new window, where you can choose any theme of your choice! I prefer a dark and minimalistic theme so I chose the “Adwaita-dark” theme. All I will say is, choose your theme wisely!
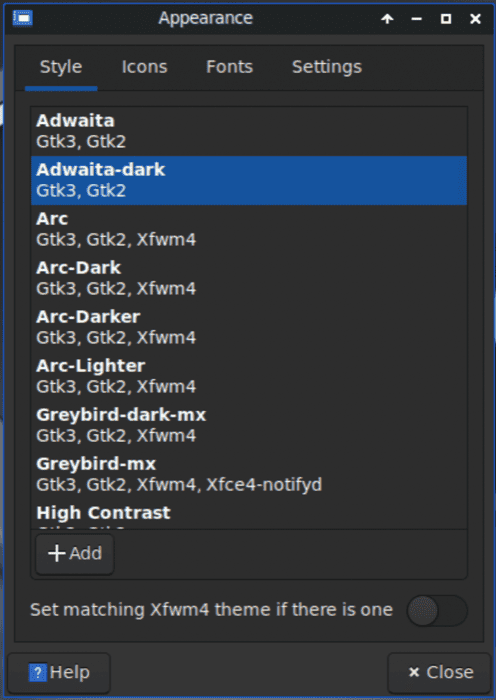
You also have the usual wallpaper customization options that allow you to change your Desktop wallpaper to anything you prefer (I choose minimalist wallpapers, but you do you! After all, you have the power).
A Powerful Package Manager
Being a Debian-based system, MX Linux uses the popular apt package manager to manage all Linux packages. However, they pride themselves with their User interfaces, so why not have one for this? Indeed, they have the “Synaptic Package Manager”.

Synaptic is a graphical package management program for apt. It provides the same features as the apt-get command line utility with a GUI front-end based on Gtk+.
You can perform and manage every package in your system using this versatile tool through a rich and user-friendly UI. We already used it in this tutorial when we updated our system.
MX Tools: Your All-In-One Toolkit
MX Tools is a compilation of graphical resources that make this a unique OS compared to other Linux distributions. MX Tools makes it easyto access most system tasks, from customizing boot options to repo management through this unified interface.
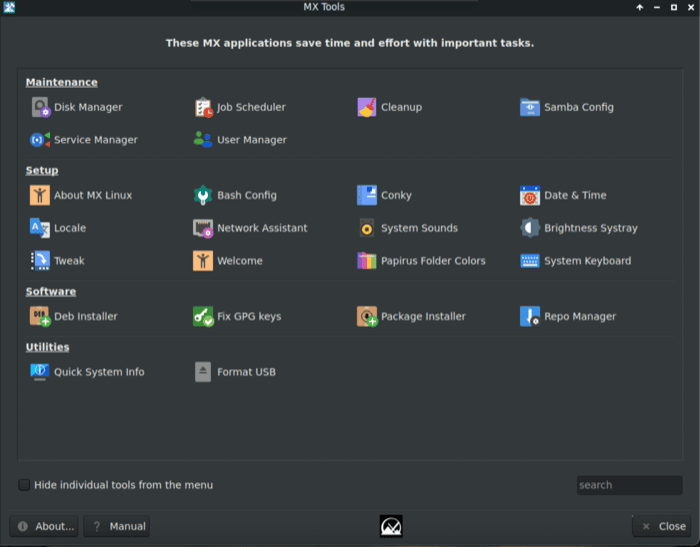
You can think of it as the Windows Control Panel on steroids. For instance, one popular task in Linux is to create bootable .iso files for an Operating System you have set up for a particular application. You can do this very easily on MX Linux with MX Snapshot Utility.
This is just one example, the possibilities are endless. MX Linux community continues to develop useful utilities that make this OS easier and more convenient for casual users and developers.
Download Your Essential Linux Commands Guide!
It's a free PDF guide containing every Raspberry Pi Linux command you should know!
Download now
🛠 This tutorial doesn't work anymore? Report the issue here, so that I can update it!
If you are looking for exclusive tutorials, I post a new course each month, available for premium members only. Join the community to get access to all of them right now!
You may also like:
- Auto start any program when the Raspberry Pi boots up
- 57 Raspberry Pi commands you need to know
- Master Raspberry Pi in 30 days with this
- Remote access your Pi from anywhere (best apps)
- Create an image of your SD card (safety first!)
Conclusion
Great! You now know how to install and set up MX Linux on your Raspberry Pi. Let’s go through the things we covered in this tutorial:
- First, we learned how to install the MX Linux OS package for the Pi and then flash it onto an SD Card or USB drive.
- Next, we took a crash course on the first boot setup and basic post-installation steps for MX Linux.
- Finally, we learnt more about some key differentiating features of MX Linux.
This is just a start. You have a lot more that you can do with your Raspberry Pi. For instance, you can try other popular Linux Operating Systems on your Pi. Here are some articles you will find helpful:
- How To Install And Use Fedora On Your Raspberry Pi?
- How to Start Using CentOS on your Raspberry Pi?
- How to Install Rocky Linux on your Raspberry Pi?
Whenever you’re ready, here are other ways I can help you:
The RaspberryTips Community: If you want to hang out with me and other Raspberry Pi fans, you can join the community. I share exclusive tutorials and behind-the-scenes content there. Premium members can also visit the website without ads.
Master your Raspberry Pi in 30 days: If you are looking for the best tips to become an expert on Raspberry Pi, this book is for you. Learn useful Linux skills and practice multiple projects with step-by-step guides.
The Raspberry Pi Bootcamp: Understand everything about the Raspberry Pi, stop searching for help all the time, and finally enjoy completing your projects.
Master Python on Raspberry Pi: Create, understand, and improve any Python script for your Raspberry Pi. Learn the essentials step-by-step without losing time understanding useless concepts.
You can also find all my recommendations for tools and hardware on this page.
